Friday, September 14, 2012

Thursday, May 24, 2012
The Sand Pail List + an easy plan for the Best Memorial Day ever!
Summer is quickly approaching here in the north east, and with that comes the annual question of "what are we going to do this summer?" I don't know how it works in your house, but around here we always start with big plans, lots of ideas, and by the time the beginning of July rolls around, no one can remember anything they had wanted to do!
I used to write ideas down on a piece of paper, but it never seemed to live up to the excitement that summer promises. Then I graduated to a book, but again it never seemed quite right. Recently I discovered something that seems j-u-s-t right! (thanks Better Homes & Gardens for the idea!)
Presenting ..........
The Sand Pail List!

Think Bucket List - but for the summer. Sand Bucket List would also work, but there's something a bit morbid about that.......
So, Sand Pail List it is! Summons up feelings of playfulness, childhood and endless fun - just what summer should always be.
Here's how it works -
be organized.....evelyn
PS - If you have no plans for the long weekend - here's my plan for the BEST Memorial Day Ever! http://bit.ly/Kd4Umi
I used to write ideas down on a piece of paper, but it never seemed to live up to the excitement that summer promises. Then I graduated to a book, but again it never seemed quite right. Recently I discovered something that seems j-u-s-t right! (thanks Better Homes & Gardens for the idea!)
Presenting ..........
The Sand Pail List!

Think Bucket List - but for the summer. Sand Bucket List would also work, but there's something a bit morbid about that.......
So, Sand Pail List it is! Summons up feelings of playfulness, childhood and endless fun - just what summer should always be.
Here's how it works -
- make yourself a colorful cover - draw, paint, download - whatever. I did this one on Printshop.
- put a few blank pages inside - no more then 4 - you don't want to overwhelm yourself!
- gather the family and ask them - "what types of things would you like to do this summer?"
- write them down in the book - no particular order.
- keep the book somewhere handy - I keep ours in our "treasure chest" for easy updates and check offs.
- once a week, schedule some time to do something on The Sand Pail List! You can do more then one a week if you like - just make sure you get to some of them!
- no pressure to do it all - as long as you do some, the summer will be a success!
- next fall, look back and remember all you did this summer in the name of fun.
be organized.....evelyn
PS - If you have no plans for the long weekend - here's my plan for the BEST Memorial Day Ever! http://bit.ly/Kd4Umi
Thursday, May 10, 2012
How To Organize a Bedroom with Little Furniture
Short, sweet and to the point today - How To Organize a Bedroom with Little Furniture.

Okay, I look like I'm living in a cave in this video, but ignore the surroundings - the info is golden.
Even if you use just one of the ideas presented here, your morning routine will go better. I promise.
Woo hoo ! After many, many days of rain - the sun is finally shining!!!!!!
be organized........evelyn
P.S. - new website coming soon! watch this space..................
Thursday, May 3, 2012
Think You Know How to Tie Your Shoes? Think Again! Shoe Tying 101
It's the little things in life that drive you crazy. Like tying your shoelaces, only to have to tie them again a few hours later.
Always drove me crazy.....until I discovered how to "beat" the shoelaces once and for all.
Now, this isn't an earth shattering blog post, but it does make your life just a bit easier,,,,,and that's my goal.
 |
| shoe - regular laces |
Problem: shoelaces that always untie like magic - especially those round ones that are on all athletic shoes nowadays.
Solution:
1.tie an overhand knot at the end of each lace.
 |
| see the knots? |
2. tie the shoe like you normally would, but pull the laces all the way through until you reach the knots you just tied. Normally you would only pull about half way, but instead, just keep pulling. The knots will stop the laces from pulling all the way through and out. Hard to explain, easy to do.
 |
| pulled all the way to the ends |
3. tie another knot with the laces, i.e. a double knot.
 |
| tied once and for all! |
That's it - you're done!
The action of pulling the laces all the way through to the knots is what keeps the knot from untying.
Don't knock it until you've tried it. Won't save you a ton of time every day, but it will save you a ton of frustration.
And yes, that is a really large (men's size 12) blue sneaker with hippos on it. Anyone else have a teen boy who's really into pop culture? Anyone?
be organized......evelyn
P.S. - Hey - I'm starting something new! In addition to my once a week blog posts (leave your email in the box on the right next to the title if you want to get them automatically), I'm going to start sending out a quick happiness idea every Friday morning. Want to be in the club that gets them? Shoot me an email at: evelyn@organizingwithevelyn.com or leave a comment below.
Thursday, April 26, 2012
My Biggest Timesaver
Feeling overwhelmed by all the places you have to be and all the things you have to do? Take a look at my video "How To Organize a Timetable for your Household". Hope you get some great ideas - they work for us!

be organized.....evelyn

be organized.....evelyn
Thursday, April 19, 2012
Creative Storage 101
Something different today!
Presenting a special guest blog by blogger Lisa Kane - all about finding new places to store things. Enjoy!
And let me know what you think!
be organized.....evelyn
Presenting a special guest blog by blogger Lisa Kane - all about finding new places to store things. Enjoy!
And let me know what you think!
There comes a time in every organizer’s life when the space
simply runs out. It happens slowly, but eventually the space is going to run
out. If you’ve reached your organization threshold then consider these creative
tips for making the most out of every space.
1. Deck the walls
One of the areas with the most potential in your home is the
walls. Think about how much empty real estate you have, just ready for shelves
so you can start utilizing the space. This type of storage strategy works best
when you think of terms of what’s display-worthy. Your extra towels and
cleaning supplies aren’t going to look that great on the wall, but your kids’
toys or your collection of hats might. Pick out things that would make a great
display and put them up on the shelves instead of in the back of the closet.
 |
| An example from my house - our vitamins. Evelyn |
2. Look up
Another area that’s often overlooked is the top of high
furniture. If you have a tall wardrobe or bookcase it’s unlikely that you’ve
used the space on top for storage. The best furniture for this kind of
application will be deep so the top has a lot of surface area. Remember that
you don’t have to fill up all the space if you’re concerned about the
appearance. You can put things near the wall and no one will be able to see
them from below. Make sure you choose items that you don’t need often because
getting them up and down can be a bit of a chore.
3. Go to the bathroom
The title might seem a little bit weird, but the bathroom is
typically underused when it comes to storage. Take a look at your bathrooms to
see what extra space could be converted into storage. Many showers have a ledge
above the shower that can be converted into a shelf for decorative boxes.
Depending on the layout of your bathroom, you can also create a corner nook to
hold everything from extra bathroom supplies to last year’s Christmas
decorations. You’ll be surprised at how much extra space you were ignoring in
the bathroom.
4. Multipurpose when possible
One of the most interesting storage solutions I’ve seen was
a living room chair that also served as a bookshelf. If you’re having trouble
imagining how that would work, picture a large lounge chair with a hollowed out
frame to hold books inside and the cushion on top. You might not be able to
make your current furniture hollow, but there are certainly some areas where you
can double up on usefulness. Take the drawers out of a side table and make it
into a bookshelf, or go even further and create an entire entertainment system
out of bookshelves. Whatever you do, make sure it serves at least two purposes.
These tips should get you started on thinking creatively
about storage, but don’t forget your other options if you still don’t have
enough space. Self-storage is a good solution for anyone who simply can’t
squeeze out another inch of room.
Author’s bio: Lisa Lane is an expert on storage units and how to maximize usable
space in your home. She got her start in organization when she managed storage units in
Tallahassee but since then she moves and keeps her collection of rare books
in storage units
in Virginia Beach.
be organized.....evelyn
Thursday, April 12, 2012
How To Stop Drowning in Paper!
So - how much paper comes into your house every day....every week? Where's it all ending up?
How about in here?
This short 4 minute video I did will give you a fool proof system to deal with it before it takes over your life.
Watch it, do it, be it. Hope it makes your life just a little bit easier!
Have a great day!
be organized.....evelyn
p.s. - new website on the horizon soon - check back often for updates!
How about in here?
 |
| The famous Treasure Chest! |
This short 4 minute video I did will give you a fool proof system to deal with it before it takes over your life.
Watch it, do it, be it. Hope it makes your life just a little bit easier!
Have a great day!
be organized.....evelyn
p.s. - new website on the horizon soon - check back often for updates!
Thursday, March 29, 2012
Are There More Toys In Your House Than You Can Count? Here's What to Do About Them.....
Toys taking over your life?

Get more done and have more fun with the ideas in this video.
And yes, that's me!
And my living room......
Hope you got at least one idea in the video to make your life & home the heaven you want it to be.
Changes are in the air! Exciting things coming up in the next few weeks...busy launching my book to best seller status and jumping in to write a new one! Stay tuned......
be efficient & organized.....evelyn
Friday, March 16, 2012
Is Your Refrigerator as Cool As You Are?
So - how's your refrigerator looking these days?
Crammed full? Inside & out?
If it is, it's not helping your state of mind.
Time to do something about it. Time to get a system for it.
First - the outside.
Now - for the inside. One of my first posts was all about cleaning, de-cluttering and setting up a system for your fridge. Read it here.
Now that you've got the steps, set a timer for 15 minutes and work on your fridge - inside or out, your choice. Which one is driving you crazy? Do that one first.
Congrats! You've made a part of your world just a bit better!
Your reward? Now set a timer for 15 minutes and go read, sit in the sun, take a power nap, whatever floats your boat. Take some time for yourself, you've earned it.
be organized & efficient........
Evelyn Cucchiara
P.S. - Hey - I'm starting something new! In addition to my once a week blog posts (leave your email in the box on the right next to the title if you want to get them automatically), I'm going to start sending out a quick happiness blast every Friday morning. Want to be in the club that gets them? Shoot me an email at: evelyn@organizingwithevelyn.com or leave a comment below.
Crammed full? Inside & out?
If it is, it's not helping your state of mind.
Time to do something about it. Time to get a system for it.
First - the outside.
- remove anything you've tacked to it. There are better places for utilitarian lists and notes - like the inside of your kitchen cabinets. That way you can see them when necessary, but everyone else doesn't have to.
- give the surface a good cleaning with your favorite spray cleaner.
- put something on the fridge that makes you smile. One magnet - fine. 400 magnets - not so fine. Clutter stuck to your fridge is just as bad as clutter on your table. They all effect your state of mind.
- why not put something unique on the fridge? I have three framed oil paintings - I found them at a garage sale and just put magnetic tape on the back. Looks great - and I'm probably the only one on the block with that on the fridge!
- Use your imagination - a favorite greeting card, a drawing from your child, (just one please, and do it up right - how about this ritzy magnetic frame? Maybe a postcard from your brother who's traveling cross country....again. (Just saying.)
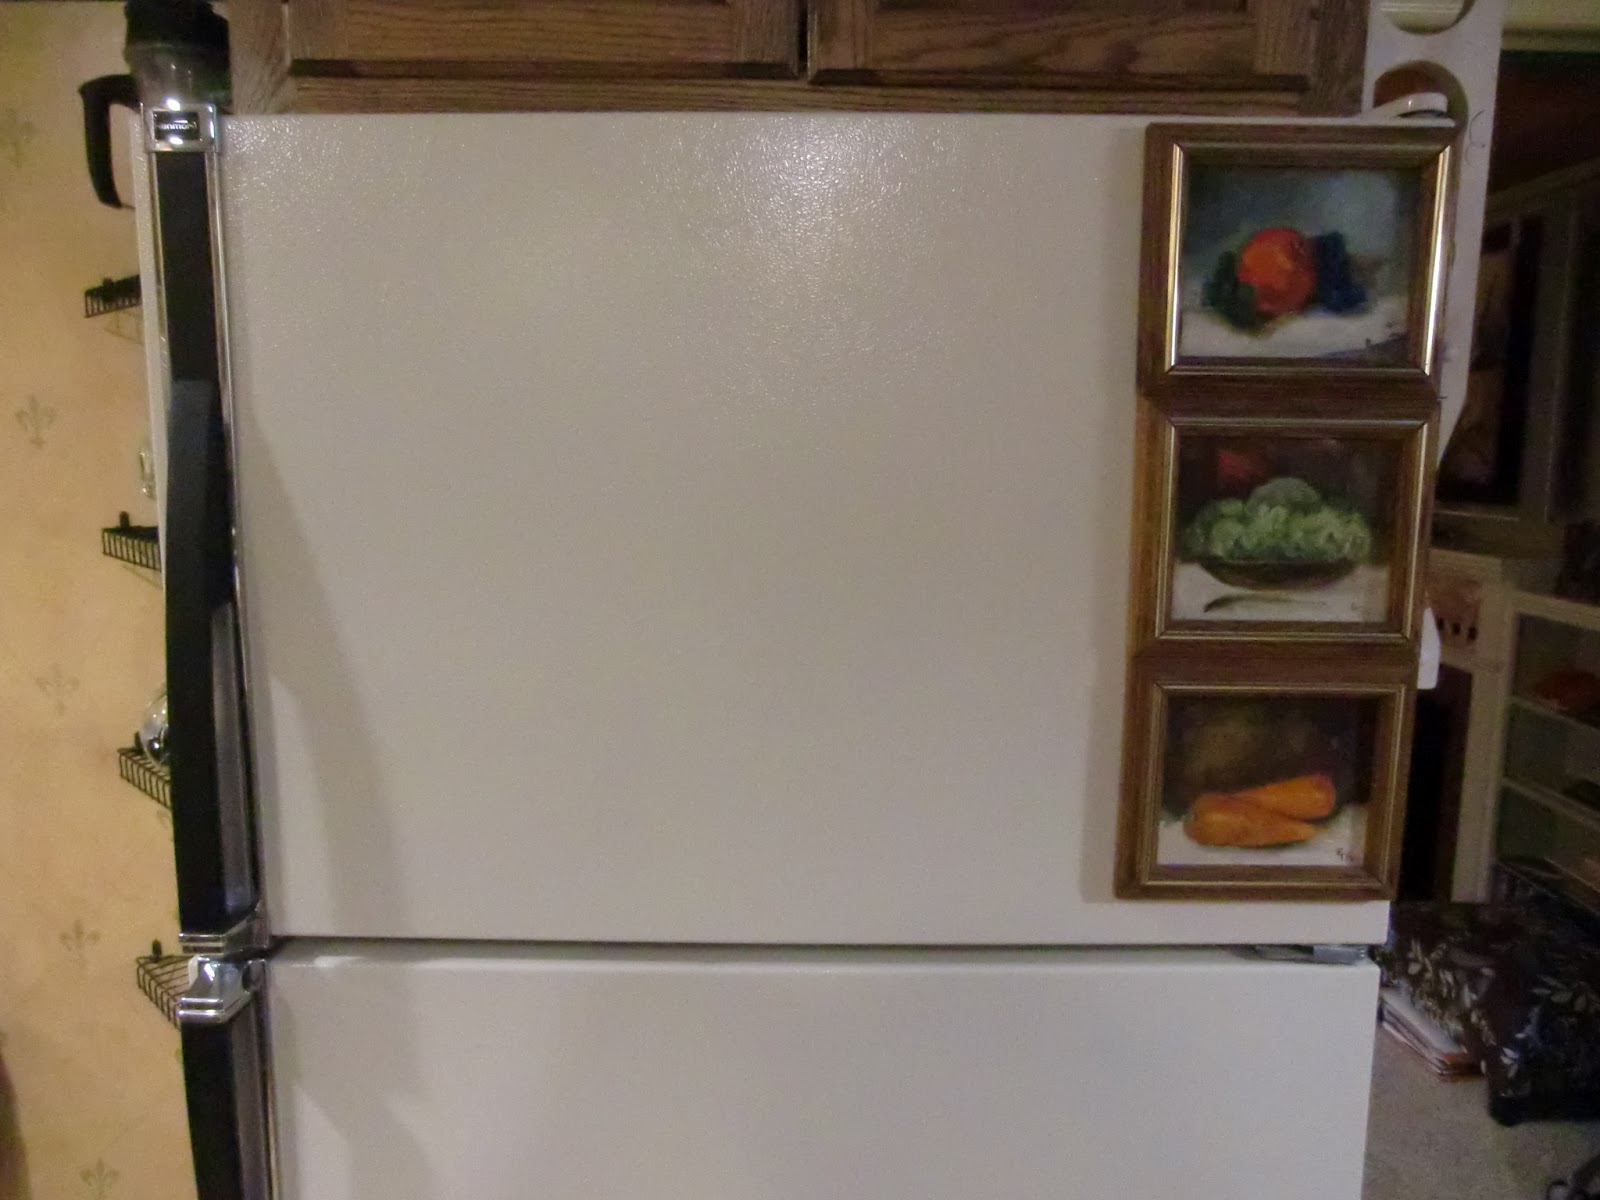 |
| different huh? Here's a close up: |
 |
| part kitchen, part art gallery |
Now - for the inside. One of my first posts was all about cleaning, de-cluttering and setting up a system for your fridge. Read it here.
Now that you've got the steps, set a timer for 15 minutes and work on your fridge - inside or out, your choice. Which one is driving you crazy? Do that one first.
Congrats! You've made a part of your world just a bit better!
Your reward? Now set a timer for 15 minutes and go read, sit in the sun, take a power nap, whatever floats your boat. Take some time for yourself, you've earned it.
be organized & efficient........
Evelyn Cucchiara
P.S. - Hey - I'm starting something new! In addition to my once a week blog posts (leave your email in the box on the right next to the title if you want to get them automatically), I'm going to start sending out a quick happiness blast every Friday morning. Want to be in the club that gets them? Shoot me an email at: evelyn@organizingwithevelyn.com or leave a comment below.
Thursday, March 8, 2012
Bake Life More Easy
No - that's not a misprint.
I'm spearheading a campaign to get more home baked goods back into the lives of everyday people. Back to the cookies and milk after school. Back to homemade dessert.
Why? Lots of reasons.
and you're good to go.
But you do need to set your kitchen up to make it easy.
Here's my idea for the day.
Store your flour, sugar and other baking supplies in glass canisters on display in your kitchen
Why?

It's big canister - over a foot tall. Holds a five pound bag of flour with ease. I especially recommend Trader Joe's or King Arthur's White Whole Wheat Flour - all the nutrition of whole wheat without the heavy taste. Bakes just like white flour too! (Yes, I know I sound like Lucy in the Vitameatavegimin skit).
I keep sugar in another -

The sugar is in a smaller canister. I think I got all of these at Pier One over 20 years ago!
And they are simply stored on triangle wire shelves we put up in an unused corner. Works like a bakers rack - remember those? - but takes up lots less space. Also been there over 20 years. And those are the coffee pods for the Nespresso coffee maker behind the sugar. Love, love, love that coffee maker!
So - that's it. A simple idea - but one that works really well. Now go try it. And go bake the muffins. They're really good!
And anyone in the Madison, NJ area - I'm speaking at the Madison Library this Wednesday night - March 14th, 2012. Come on out and say hi - and get even more ideas on how to Get More Done While Having More Fun - my new motto.
be organized....evelyn
PS - Changes are-a-coming. Stay tuned for announcements and all sorts of new stuff!
P. P.S. - Speaking of new stuff - In addition to my once a week blog posts (leave your email in the box on the right next to the title if you want to get them automatically), I'm going to start sending out a quick happiness idea every Friday morning. Want to be in the club that gets them? Shoot me an email at: evelyn@organizingwithevelyn.com or leave a comment below.
I'm spearheading a campaign to get more home baked goods back into the lives of everyday people. Back to the cookies and milk after school. Back to homemade dessert.
Why? Lots of reasons.
- When you go to the store, the prices of muffins, cookies & cakes are astounding.
- The first ingredient in many store bought goods is sugar.(How can that be? I don't think I've ever seen a recipe that has more sugar then flour in it -so how can it be possible for store bought goods? A question to ponder another time....)
- Most baked items you buy at the store are full of junk. 'nuff said.
- Memories are made of cookies baking in the oven - not sitting in a package on the counter.
and you're good to go.
But you do need to set your kitchen up to make it easy.
Here's my idea for the day.
Store your flour, sugar and other baking supplies in glass canisters on display in your kitchen
Why?
- It's easier to bake something when you don't have to dig the flour out from behind the mountain of cereal in the closet.
- You can see when you're running low and it's time to restock.
- The canisters add to the "homeyness" of your home.

It's big canister - over a foot tall. Holds a five pound bag of flour with ease. I especially recommend Trader Joe's or King Arthur's White Whole Wheat Flour - all the nutrition of whole wheat without the heavy taste. Bakes just like white flour too! (Yes, I know I sound like Lucy in the Vitameatavegimin skit).
I keep sugar in another -

The sugar is in a smaller canister. I think I got all of these at Pier One over 20 years ago!
And they are simply stored on triangle wire shelves we put up in an unused corner. Works like a bakers rack - remember those? - but takes up lots less space. Also been there over 20 years. And those are the coffee pods for the Nespresso coffee maker behind the sugar. Love, love, love that coffee maker!
So - that's it. A simple idea - but one that works really well. Now go try it. And go bake the muffins. They're really good!
And anyone in the Madison, NJ area - I'm speaking at the Madison Library this Wednesday night - March 14th, 2012. Come on out and say hi - and get even more ideas on how to Get More Done While Having More Fun - my new motto.
be organized....evelyn
PS - Changes are-a-coming. Stay tuned for announcements and all sorts of new stuff!
P. P.S. - Speaking of new stuff - In addition to my once a week blog posts (leave your email in the box on the right next to the title if you want to get them automatically), I'm going to start sending out a quick happiness idea every Friday morning. Want to be in the club that gets them? Shoot me an email at: evelyn@organizingwithevelyn.com or leave a comment below.
Thursday, March 1, 2012
The Little Green Pill That Makes Life Easy Again.
So every once in awhile you come across a product that you would take with you to a deserted island.
This is one of those products.
It smooths out one of the biggest bumps in life.
Time for a story!
Once upon a time, there was a dairy family. No, they didn't raise cows - they ate a lot of dairy products. Especially ice cream. (Like you may remember from a previous blog. http://bit.ly/xyo9fA)
And cheese.
But there was a problem. And it wasn't a lack of calcium intake.
The problem was that one of the youngest family members also had frequent tummy aches. To the point where the family would often find themselves racing around looking for a restroom. The average person would have made the connection sooner rather then later.
This is no average family.
Fast forward a few more years. Still eating dairy, still having tummy aches.
One day the light bulb lit up! Maybe, possibly, could it be that the young family member was lactose intolerant? Eureka! Turned out the family member WAS lactose intolerant! And those big chewable pills you take before every meal are the answer!
Well, not quite. Not so fast. Not for this family. What seemed like a perfect answer was really more of a nuisance. The family never seemed to remember the pill. It was home while they were out, it was out while they were home. And the young child didn't like the pill. Any missing it just once meant another search for the restroom. RIGHT THIS MINUTE!!!!!
Again, the average family would have just given up dairy. Again, this is no average family. This is a family that regularly attends an ice cream festival and knows where every good ice cream parlor is in the state.
And then one day a new pill was found! A pill that only gets taken once a day - like a vitamin!
A pill that simply gives the body the enzyme it needs to process lactose!
And the enzyme builds up in the body so if you forget it one day it makes no difference!
And the pill is tiny and easy to swallow!
That pill is Digestive Advantage Lactose Defense Formula!
It really is magic. I know because we are that family.
Since this over the counter pill came into our lives it's like the lactose intolerance has disappeared!
You have got to try this. If you or anyone you know has a problem with lactose, get some of these pills. A month supply costs less then $10.00. Get more info here: http://www.schiffvitamins.com/product_detail.asp?id=206
Now I know this isn't an organizing tool, but it is a Life Made Better Tool, hence the reason I'm talking about it. I'm all for anything that makes life simpler, better, calmer happier. Just easier all around!
be organized.....evelyn cucchiara
P.S. - Hey - I'm starting something new! In addition to my once a week blog posts (leave your email in the box on the right next to the title if you want to get them automatically), I'm going to start sending out a quick happiness idea every Friday morning. Want to be in the club that gets them? Shoot me an email at: evelyn@organizingwithevelyn.com or leave a comment below.
This is one of those products.
 |
| Possible again! |
Time for a story!
Once upon a time, there was a dairy family. No, they didn't raise cows - they ate a lot of dairy products. Especially ice cream. (Like you may remember from a previous blog. http://bit.ly/xyo9fA)
And cheese.
But there was a problem. And it wasn't a lack of calcium intake.
The problem was that one of the youngest family members also had frequent tummy aches. To the point where the family would often find themselves racing around looking for a restroom. The average person would have made the connection sooner rather then later.
This is no average family.
Fast forward a few more years. Still eating dairy, still having tummy aches.
One day the light bulb lit up! Maybe, possibly, could it be that the young family member was lactose intolerant? Eureka! Turned out the family member WAS lactose intolerant! And those big chewable pills you take before every meal are the answer!
Well, not quite. Not so fast. Not for this family. What seemed like a perfect answer was really more of a nuisance. The family never seemed to remember the pill. It was home while they were out, it was out while they were home. And the young child didn't like the pill. Any missing it just once meant another search for the restroom. RIGHT THIS MINUTE!!!!!
Again, the average family would have just given up dairy. Again, this is no average family. This is a family that regularly attends an ice cream festival and knows where every good ice cream parlor is in the state.
And then one day a new pill was found! A pill that only gets taken once a day - like a vitamin!
A pill that simply gives the body the enzyme it needs to process lactose!
And the enzyme builds up in the body so if you forget it one day it makes no difference!
And the pill is tiny and easy to swallow!
That pill is Digestive Advantage Lactose Defense Formula!
It really is magic. I know because we are that family.
Since this over the counter pill came into our lives it's like the lactose intolerance has disappeared!
You have got to try this. If you or anyone you know has a problem with lactose, get some of these pills. A month supply costs less then $10.00. Get more info here: http://www.schiffvitamins.com/product_detail.asp?id=206
Now I know this isn't an organizing tool, but it is a Life Made Better Tool, hence the reason I'm talking about it. I'm all for anything that makes life simpler, better, calmer happier. Just easier all around!
be organized.....evelyn cucchiara
P.S. - Hey - I'm starting something new! In addition to my once a week blog posts (leave your email in the box on the right next to the title if you want to get them automatically), I'm going to start sending out a quick happiness idea every Friday morning. Want to be in the club that gets them? Shoot me an email at: evelyn@organizingwithevelyn.com or leave a comment below.
Thursday, February 23, 2012
How to Display All those Flat Things - Once & For All!
 |
| Have any like this? |
You prop them up. They fall down. They sit on your kitchen window sill. The languish on top of the dryer. It seems like you are always moving them from point A to B.
I have a solution.
It's easy & low cost.
It will solve the problem.
What is it you ask?
It's all those corks that you've saved from wine bottles. Yes, those that are clogging up your kitchen drawer.
Time to take them out and make them earn their keep.
 |
| see...easy to add! |
The cork acts as a stand, making it easy to display the object without fear of it falling over.
Here's an example.
Two clay fish made by two of my children.
Flat - they take up space. With a cork glued to the back, they can stand up and be seen.
 |
| He stays vertical! |
 |
| Now they swim happily! |
be organized.....evelyn
P.S. - Hey - I'm starting something new! In addition to my once a week blog posts (leave your email in the box on the right next to the title if you want to get them automatically), I'm going to start sending out a quick happiness idea every Friday morning. Want to be in the club that gets them? Shoot me an email at: evelyn@organizingwithevelyn.com or leave a comment below.
Thursday, February 16, 2012
Hate Your Kitchen Table? Here's What To Do About It
How's your kitchen table looking these days?
If you happen to live in a busy household, (like me), and your kitchen is the main hub of that household, (like me), and you bought a really inexpensive, okay, I admit it, cheap, pine table years ago from IKEA, (like me), your table may no longer be looking its best. And that's probably an understatement.
It probably has marks, scratches and impressions of long ago homework etched into its surface.
It's not very happy.
Time for a makeover. An easy makeover. A makeover with personality, pizazz and a touch of personalization.
Think hand prints. But not your red, blue, yellow preschool-like hand prints. Think metallic hand prints. Now, I'm not against primary color hand prints, but they get old quickly. Especially when your kids keep growing. If you're going to invest a bit of time giving your table a makeover, you might as well do something that will stand the test of time. And you don't get sick of.
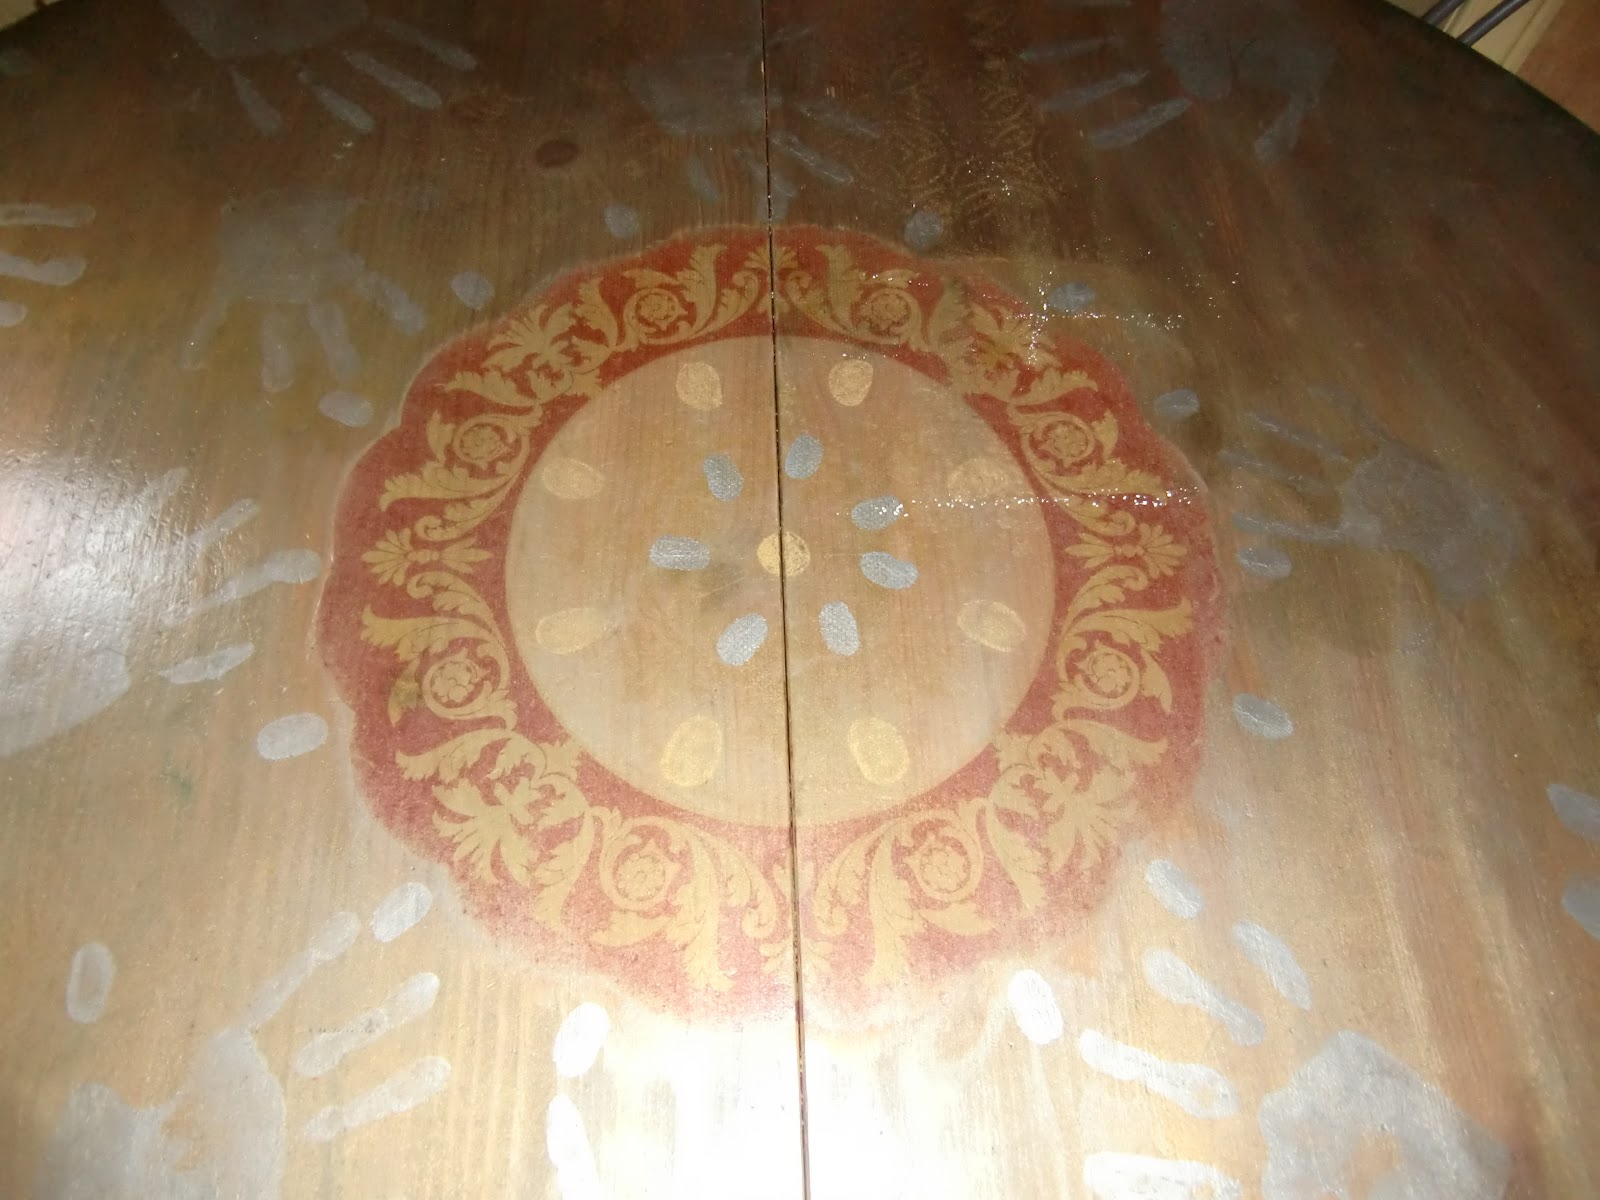
Here's my table. I did it years ago, and I'm still happy with it. The chairs are from IKEA also, I just covered the seats with fabric and a bit of padding.
 |
| The finished table. Interesting - right? |
Here's how to do it. And it's not hard. I worked outside so I wouldn't have to worry about dust & fumes.
- Sand the table slightly to get rid of any sealer on top.
- If you want a color other then the table color, paint the top. I used a light green wash. You can see it on the edges.
- Decide on a focal point - I used a napkin. It's the red circle thing in the picture. I simply put a bit or polyurethane on the table, then put the napkin down. I smoothed it with a paint brush.
- Call the kids one at a time. Paint their hands with any paint you want - just make sure it is acrylic or latex. Something that is permanent once it's dry.
- Make some hand prints. We also did fingerprints around the napkin.
- Let dry.
- If your table opens up for a leaf, carefully cut the napkin along the opening with a razor blade.
- Coat the entire table top with polyurethane.
- Let dry.
- Coat it again.
- Let dry.

Want to really think outside the box? Don't use your kid's hand prints - use your pets. I guarantee your table will be one of a kind. And if you do that, take a picture and send it to me - I'd love to see that!
be organized & happy.....evelyn cucchiara
P.S. - Hey - I'm starting something new! In addition to my once a week blog posts (leave your email in the box on the right next to the title if you want to get them automatically), I'm going to start sending out a quick happiness idea every Friday morning. Want to be in the club that gets them? Shoot me an email at: evelyn@organizingwithevelyn.com. First one will be tomorrow!
Thursday, February 9, 2012
Shhhh...The Secret to conquor Eczema once & for all!
There's a light dusting of snow here on the ground in NJ, and that brings to mind how rough, dry & painful me hands used to be every winter. No more.
The back story.
I teach art everyday, so my hands are always in and out of water. This lead to an outbreak of eczema - a painful condition of the skin that goes way past simple dryness. Eczema is itchy, red, flaking and painful! Painful to the point of bleeding. And itchiness that makes poison ivy look like a walk in the park. Not good.
I went to the doctor and was prescribed steroid creme, the usual remedy. This helped a bit, but I really didn't like the thought of putting all those steroids on my skin multiple times a day. And I mean multiple. And it was expensive.
So I started experimenting. I bought all types of skin creams that promised to take care of the problem. some were really messy (thick cream and gloves every night at bed time), some were expensive (the one made from sheep lanolin from Australia comes to mind), but none of them did much good. Some would help a bit, but I always knew the eczema was hovering under the surface, just waiting to come back.
Then I stumbled upon the secret formula.
I say secret because it's not one product that takes care of the problem - it's the combination of two. Two unrelated products. And I have no idea if anyone other them me has ever combined the two.
Ready - here's the answer -

1. - O'Keefe's Working Hands Creme - this is a solid hand creme that is sold in the hardware section of DIY stores. Or here online. And it's not expensive. And it lasts forever.
but that's not the whole answer.
You need to combine it with this-

2. Avon Silicone Glove Creme - this is a protective layer that helps seal in the first creme. Available from your local Avon lady or here. This is even cheaper.
What you do is this - simply put on the Working Hands Creme first, then top off with the Silicone Glove.
Then the magic happens. I don't know why, and I don't care. I just know it's been working for me.
For years.
Eczema is a thing of the past.
And how do I know it's the combination and not just my skin healing?
Because when I run out of one or the other, my eczema returns in a few days.
And that's not good.
If your hands are itchy & red, give it a shot. Cost is less then $10.00 - and relief is just a squeeze away.
You're welcome.
be organized.....evelyn
P.S. - want more ideas? Try my book - just click here.
Thursday, February 2, 2012
Expand Your Wardrobe Without Spending A Cent!
Time to address one of those annoying little things in life. It's one of those things that once you do it, you wonder why you never thought of it before.
Today we're talking sweaters.
Not how itchy some can be.
Not how soft some can be.
We're talking how some of the softest can be the most annoying because THE BUTTONS GAPE!
Picture this - you put on a sweater on a cold crisp day. It's cuddly, it's comfy. You button it up, and suddenly it looks like it has shrunk or you have (horrors!) grown bigger. Why? Because the buttons gape.
This immediately makes you feel the size of a house, even if you wear a size 2. Which I don't. So imagine how I feel!
I put up with this for years, taking sweaters out of the drawer, putting them on, only to put them back in when they just didn't look or feel right because of button gapege. Is that even a word? It should be. I was left with a dawer full of sweaters that I never wore. And I'm supposed to be organized.
You know what I mean. Instead of the placket (that's the front of the sweater where the buttons are) lying flat, it pulls around the buttons so what should have been flat and smooth now looks likes scallops. Not a flattering look on anyone.
One day it dawned on me. Since sweaters are stretchy, I could just sew them shut! It would still be easy to put on, almost easier since there are no longer any buttons to fuss with. Now I could just slide it over my head.
I pulled out a seldom worn sweater, and tried it. It worked perfectly! I used my moms old Singer machine, but you could also do it by hand. No sewing skill is really required. A few stitches, and your wardrobe suddenly expands. What was once your nemesis sweater becomes your favorite.
That's what happened with this pink one. Loved the pattern, didn't love the way it looked. A few minutes with the machine - and perfect! See, you can't even tell in the pic, but it's sewed shut! Now it's as comfy as a T shirt! And I don't have to fuss with it all day. A winning solution.
I also discovered that the sweaters I had that weren't supposed to be buttoned, open cardigans, looked and felt better, not to mention were warmer, when I sewed them shut and put on some decorative buttons.
Easy fix, and NOW I WEAR THEM!
Try it on an old sweater that you never wear. See if it doesn't give new meaning to the word recycle. It's like going shopping in your closet!
One quick tip for storing sweaters - roll them, don't fold them. I just finished a series of organizing videos on eHow - and one just happens to be on rolling sweaters. See it here. Let me know what you think. I'm not comfy yet watching myself on video, so I haven't actually watched the whole thing. What does that say about me? I'm soooooo not going there.
All of the other videos are listed there also. Try the one about organizing kids toy - its a life saver! Not to mention a living room saver!
That's it for today - I'm off to try the same idea on a shirt. The one I'm wearing right now because it's bugging me. I'll let you know how it works out.........
update: It worked ! The shirt has a bit of stretch in it, so it's easy to pull over my head. I actually feel like I stand up straighter knowing that my shirt isn't going to gape. A success!
be organized!
evelyn
PS- Don't forget - I wrote a book, 30 Days To An Organized Home, with lots more ideas like these. Click over on the picture on the right to get a free sample!
Today we're talking sweaters.
Not how itchy some can be.
Not how soft some can be.
We're talking how some of the softest can be the most annoying because THE BUTTONS GAPE!
Picture this - you put on a sweater on a cold crisp day. It's cuddly, it's comfy. You button it up, and suddenly it looks like it has shrunk or you have (horrors!) grown bigger. Why? Because the buttons gape.
This immediately makes you feel the size of a house, even if you wear a size 2. Which I don't. So imagine how I feel!
I put up with this for years, taking sweaters out of the drawer, putting them on, only to put them back in when they just didn't look or feel right because of button gapege. Is that even a word? It should be. I was left with a dawer full of sweaters that I never wore. And I'm supposed to be organized.
You know what I mean. Instead of the placket (that's the front of the sweater where the buttons are) lying flat, it pulls around the buttons so what should have been flat and smooth now looks likes scallops. Not a flattering look on anyone.
One day it dawned on me. Since sweaters are stretchy, I could just sew them shut! It would still be easy to put on, almost easier since there are no longer any buttons to fuss with. Now I could just slide it over my head.
I pulled out a seldom worn sweater, and tried it. It worked perfectly! I used my moms old Singer machine, but you could also do it by hand. No sewing skill is really required. A few stitches, and your wardrobe suddenly expands. What was once your nemesis sweater becomes your favorite.
 |
| Sew comfy now....get it? Sew instead of so? |
That's what happened with this pink one. Loved the pattern, didn't love the way it looked. A few minutes with the machine - and perfect! See, you can't even tell in the pic, but it's sewed shut! Now it's as comfy as a T shirt! And I don't have to fuss with it all day. A winning solution.
I also discovered that the sweaters I had that weren't supposed to be buttoned, open cardigans, looked and felt better, not to mention were warmer, when I sewed them shut and put on some decorative buttons.
 |
| This used to hang open - adding pounds to me and not very warm. |
Easy fix, and NOW I WEAR THEM!
Try it on an old sweater that you never wear. See if it doesn't give new meaning to the word recycle. It's like going shopping in your closet!
One quick tip for storing sweaters - roll them, don't fold them. I just finished a series of organizing videos on eHow - and one just happens to be on rolling sweaters. See it here. Let me know what you think. I'm not comfy yet watching myself on video, so I haven't actually watched the whole thing. What does that say about me? I'm soooooo not going there.
 |
| This will make sense once you watch the video. |
All of the other videos are listed there also. Try the one about organizing kids toy - its a life saver! Not to mention a living room saver!
That's it for today - I'm off to try the same idea on a shirt. The one I'm wearing right now because it's bugging me. I'll let you know how it works out.........
update: It worked ! The shirt has a bit of stretch in it, so it's easy to pull over my head. I actually feel like I stand up straighter knowing that my shirt isn't going to gape. A success!
be organized!
evelyn
PS- Don't forget - I wrote a book, 30 Days To An Organized Home, with lots more ideas like these. Click over on the picture on the right to get a free sample!
Thursday, January 26, 2012
How to Look at Snow in a Whole New Way......
It finally snowed here last week. Mother Nature was kind enough to send the snow on a Friday night, so no cancellation of school was necessary. I thought that was kind. My kids? Not so much.
But I was able to bring a smile to their faces when I asked "Who wants snow pancakes?"
Snow pancakes? Whaaaaa?????
You never heard of snow pancakes? Get ready to rock your world......
Snow pancakes are one of the easiest things to make - and it really impresses the kids. And any adults that happen to be around, for that matter.
It's from a recipe written long, long ago when eggs were scarce in the winter, but snow was not.
It's really easy. All you do is swap the eggs in any pancake recipe for snow. For every egg, use 2 tablespoons of snow instead. It doesn't have to be an exact measurement, just scoop some up.
Here's the recipe I use:
4 spoons of snow (or 2 eggs)
2 cups flour - I use Trader Joe's white whole wheat
2 cups milk
2 tbs sugar
1/4 cup oil
1 tbs. baking powder
Mix it all together. It will puff up as it sits. Pour some on a griddle, bake until set, flip, bake a bit more - enjoy!
I've never tried it with boxed pancake mix, but I'm guessing it would work. The recipe above is so easy though, why buy mix?
Be sure to send the kids out to fetch the snow. It's part of the fun. And tell them to get CLEAN snow!
No go look at that recent snowfall in a new light.
By the way, did you know I wrote a book? Chock full of all sorts of ideas like the one above. It's called "30 Days To An Organized Home", and you can get a free sample here. Go - do it now.
be organized.....evelyn
But I was able to bring a smile to their faces when I asked "Who wants snow pancakes?"
Snow pancakes? Whaaaaa?????
You never heard of snow pancakes? Get ready to rock your world......
 |
| Picture perfect snow pancakes |
Snow pancakes are one of the easiest things to make - and it really impresses the kids. And any adults that happen to be around, for that matter.
It's from a recipe written long, long ago when eggs were scarce in the winter, but snow was not.
It's really easy. All you do is swap the eggs in any pancake recipe for snow. For every egg, use 2 tablespoons of snow instead. It doesn't have to be an exact measurement, just scoop some up.
Here's the recipe I use:
 |
| This is how we gather it. |
4 spoons of snow (or 2 eggs)
2 cups flour - I use Trader Joe's white whole wheat
2 cups milk
2 tbs sugar
1/4 cup oil
1 tbs. baking powder
Mix it all together. It will puff up as it sits. Pour some on a griddle, bake until set, flip, bake a bit more - enjoy!
 |
| A large griddle makes it easier. Get one. |
Be sure to send the kids out to fetch the snow. It's part of the fun. And tell them to get CLEAN snow!
No go look at that recent snowfall in a new light.
By the way, did you know I wrote a book? Chock full of all sorts of ideas like the one above. It's called "30 Days To An Organized Home", and you can get a free sample here. Go - do it now.
be organized.....evelyn
Thursday, January 19, 2012
How To Hide Your Big Screen TV Without Your Husband Hitting The Roof!
The bane of the big screen TV age.
Your husband wants the biggest TV screen known to man.
While you like watching the big screen, you don't like it staring at you when it's not on, a big black hole sucking the life out of the room.
What to do, what to do.
There are products on the market out there to take care of just this problem - but they're costly.
I'm here to offer a solution. An inexpensive solution.
A cheap, do it yourself, custom made solution that will make you both happy.
The details. Here's my TV. Right smack in the middle of my living room. The first thing you see when you walk into my home.
Looks like a picture - right?
Well, it is a picture. All I did was take a canvas, paint a picture on it, and hung it over the TV. Simple & effective. This is what it looks like when we're watching TV.

Here's how you can do it too.
 Taa daa! You're done!
Now, when the TV is not in use, hang the picture over it. And when it is in use, put your picture below it. Mine happened to fit perfectly hanging on the moulding around the fireplace. See what works for you.

Now you have the best of both worlds - big screen TV when you want it, and decorative picture when you don't. And a great conversation piece too!
In need of more ideas like this one? There's lots more in my book, "30 Days To An Organized Home". Click here for more info.
be organized.....evelyn
Your husband wants the biggest TV screen known to man.
While you like watching the big screen, you don't like it staring at you when it's not on, a big black hole sucking the life out of the room.
What to do, what to do.
There are products on the market out there to take care of just this problem - but they're costly.
I'm here to offer a solution. An inexpensive solution.
A cheap, do it yourself, custom made solution that will make you both happy.
The details. Here's my TV. Right smack in the middle of my living room. The first thing you see when you walk into my home.
 |
| (Yes - I have a copper colored ceiling. If you want to see more about that, click here.) |
Looks like a picture - right?
Well, it is a picture. All I did was take a canvas, paint a picture on it, and hung it over the TV. Simple & effective. This is what it looks like when we're watching TV.

Here's how you can do it too.
- Measure the size of the area you want to cover. My TV has a huge black frame around the actual screen, so I decided to cover just the screen itself.
- Order stretcher strips in exactly the size you need from any art supply store, or on line here. You will need 4 - two of the vertical measurement, 2 of the horizontal.
- Order a piece of canvas at least 8 inches bigger then the size of your finished picture. Order it primed (means it already has a coating of white on it so you don't have to do it.) Again, an art supply store or here.
- Assemble the stretcher strips. Stretch the canvas on the strips. You will need a staple gun for this. (easy directions on how to stretch a canvas here.)
- Paint a picture on it with acrylic paints. Now, don't get intimidated by this. I found a picture in a catalog I liked, and then copied it onto the canvas. You could paint anything you want to - or have the kids do a masterpiece. The point is just get one color on it and have fun! Let dry.
- Attach two hooks to the back. 2 wreath hangers work well for this. I made some hooks out of some strips of metal I had in the basement.
- Screw the hooks to the back of the picture.
- Apply some cushioning of some sort to the inside of the hooks so they won't scratch the TV screen. I used felt adhesive pads.

Now, when the TV is not in use, hang the picture over it. And when it is in use, put your picture below it. Mine happened to fit perfectly hanging on the moulding around the fireplace. See what works for you.

Now you have the best of both worlds - big screen TV when you want it, and decorative picture when you don't. And a great conversation piece too!
In need of more ideas like this one? There's lots more in my book, "30 Days To An Organized Home". Click here for more info.
be organized.....evelyn
Thursday, January 12, 2012
Does This Drive You Crazy Like It Drives Me Crazy?
I'm convinced that it will be the minor things that completely unhinge us. Am I right? What's on your list?
One of the things on my list was spotty glasses. Now I know this sounds trivial, but everyday when I pulled a drinking glass out of the cabinet, it would depress me to see that what was once a shiny sparkling glass was now a cloudy mess. Almost white. Really, really bad. Got to the point where I didn't want to offer a drink to anyone!
Anyway, before you think I'm just a terrible glass washer, let me place the blame where it belongs. It's not my fault.
I live in the Northeast United States. We have really, really hard water. Full of all sorts of wonderful minerals. Minerals that leave your glasses and dishes looking like you never wash them. (This also means that we need to replace all of our faucets every few years. But that's another story for another day.)
 Today I'm here to tell you I have found the Holy Grail, the answer to my cloudy glass problem. And it truly is a miracle.
Non toxic.
Cheap.
Easy.
(And no, the answer isn't buy all new glasses. I already did that. Only a temporary fix).
The answer is - common everyday white VINEGAR!
You will not believe how this solves the problem.
The Steps
I don't know.
I don't care.
I'm just happy it works.
My second favorite use for vinegar? Getting rid of the hard water deposits from the above mentioned hard water. Just soak a cloth in vinegar, wrap it around the base of the fixture where the deposits accumulate, leave it there for the entire day, then just wipe away the residue.
Again - how does it work? I have no idea. Do I care? Nope.
There are hundreds of uses for vinegar. If you get so excited about your clean glasses & fixtures and just can't stop using it, click here to find out more ways vinegar can be your new best friend.
And for those of you chanting about how I should just get a water softener - I have one. It just hasn't been installed yet. And that's really a story for another day!
By the way, have you purchased my book yet? You really should. It will change your life for the better, give you back your free time and make wonder why you waited. http://www.organizingwithevelyn.com
be organized.....evelyn
One of the things on my list was spotty glasses. Now I know this sounds trivial, but everyday when I pulled a drinking glass out of the cabinet, it would depress me to see that what was once a shiny sparkling glass was now a cloudy mess. Almost white. Really, really bad. Got to the point where I didn't want to offer a drink to anyone!
Anyway, before you think I'm just a terrible glass washer, let me place the blame where it belongs. It's not my fault.
I live in the Northeast United States. We have really, really hard water. Full of all sorts of wonderful minerals. Minerals that leave your glasses and dishes looking like you never wash them. (This also means that we need to replace all of our faucets every few years. But that's another story for another day.)

Non toxic.
Cheap.
Easy.
(And no, the answer isn't buy all new glasses. I already did that. Only a temporary fix).
The answer is - common everyday white VINEGAR!
You will not believe how this solves the problem.
The Steps
- Get a really big bottle of vinegar. Costco sells it by the gallon jug. Perfect.
- Pour the vinegar into a basin or bowl.
- Put your glasses in. It's best if you can submerge them, that may require purchasing 2 gallons of vinegar. I put mine in and rolled them around.
- Let soak for an hour.
- Give a quick scrub - and voila! Your glasses will be sparkling again!
I don't know.
I don't care.
I'm just happy it works.
My second favorite use for vinegar? Getting rid of the hard water deposits from the above mentioned hard water. Just soak a cloth in vinegar, wrap it around the base of the fixture where the deposits accumulate, leave it there for the entire day, then just wipe away the residue.
Again - how does it work? I have no idea. Do I care? Nope.
There are hundreds of uses for vinegar. If you get so excited about your clean glasses & fixtures and just can't stop using it, click here to find out more ways vinegar can be your new best friend.
And for those of you chanting about how I should just get a water softener - I have one. It just hasn't been installed yet. And that's really a story for another day!
By the way, have you purchased my book yet? You really should. It will change your life for the better, give you back your free time and make wonder why you waited. http://www.organizingwithevelyn.com
be organized.....evelyn
Wednesday, January 4, 2012
The 2 ideas that will make your life happier. & easier.
 If nothing else, implement these two systems this month.
You deserve happiness.
You deserve time to do what you want to do when you want to do it.
These 2 gems will give you that....and more.
Save Your Sanity: http://bestorganizingtips.blogspot.com/2011/12/simple-idea-that-will-save-your-sanity.html
Streamline Your Meals: http://bestorganizingtips.blogspot.com/2011/09/dreading-dinnertime-tonight-heres.html
Looking for more? Get tons of ideas in my book - just click here for more info.
be organized.....evelyn
Subscribe to:
Posts (Atom)